手把手教你实现 TiFlash 向量化函数丨十分钟成为 TiFlash Contributor
作者:黄海升,TiFlash 研发工程师
TiFlash 自 开源 以来得到了社区的广泛关注,很多小伙伴通过源码阅读的活动学习 TiFlash 背后的设计原理,也有许多小伙伴跃跃欲试,希望能参与到 TiFlash 的贡献中来,十分钟成为 TiFlash Contributor 系列应运而生,我们将从原理到实践,与大家分享关于 TiFlash 的一切!
前言
在前篇 TiFlash 函数下推必知必会 里我们简述了 TiDB 下推函数到 TiFlash 的开发过程,讲述了在开发过程中必知必会的一些知识。
在本篇,我们会沿着用户旅程,手把手教你具体怎么在 TiFlash 里实现一个向量化函数的~
TiDB 侧修改
step1: 打开下推
在 TiDB repo 中把要下推到 TiFlash 的函数补充到 expression/expression.go 中的 scalarExprSupportedByFlash 里。
TiDB planner 在执行算子下推到 TiFlash 的逻辑时,会依赖这个方法来判断当前函数是否能下推到 TiFlash。
step2: UT 验证下推
- expression/expr_to_pb_test.go 中的 TestExprPushDownToFlash
在 TiDB repo, expression/expr_to_pb_test.go 中的 TestExprPushDownToFlash 补充新函数的 UT。
go test $BUILD/expression/expr_to_pb_test.go即可在本地把单测跑起来。
- planner/core/integration_test.go
在 TiDB repo 中的 /planner/core/integration_test.go 中补充对应的 UT。
可以参考 planner/core/integration_test.go 中的 TestRightShiftPushDownToTiFlash 。
test case 的名字可以形如 Test${func_name}PushDownToTiFlash,形式大致如下
func Test${func_name}PushDownToTiFlash(t *testing.T) {
        store, clean := testkit.CreateMockStore(t)
        defer clean()
        tk := testkit.NewTestKit(t, store)
        tk.MustExec("use test")
        tk.MustExec("drop table if exists t")
        tk.MustExec("create table t (id int, value decimal(6,3), name char(128))")
        tk.MustExec("set @@tidb_allow_mpp=1; set @@tidb_enforce_mpp=1;")
        tk.MustExec("set @@tidb_isolation_read_engines = 'tiflash'")

        // Create virtual tiflash replica info.
        dom := domain.GetDomain(tk.Session())
        is := dom.InfoSchema()
        db, exists := is.SchemaByName(model.NewCIStr("test"))
        require.True(t, exists)
        for _, tblInfo := range db.Tables {
                if tblInfo.Name.L == "t" {
                        tblInfo.TiFlashReplica = &model.TiFlashReplicaInfo{
                                Count:     1,
                                Available: true,
                        }
                }
        }

        tk.MustQuery("explain select ${func}(a) from t;").Check(testkit.Rows(${plan}))
}
验证 ${plan}中 ${func}是否在下推到 TiFlash 的算子中。
go test $BUILD/planner/core/integration_test.go即可在本地把单测跑起来。
TiFlash 侧修改
step1: 了解前置知识
了解 TiFlash 向量化计算
TiFlash 作为一个向量化分析计算引擎,不仅仅在存储层按列存储压缩,在计算层也会按列将数据保存在内存中,并且按列对数据做计算。
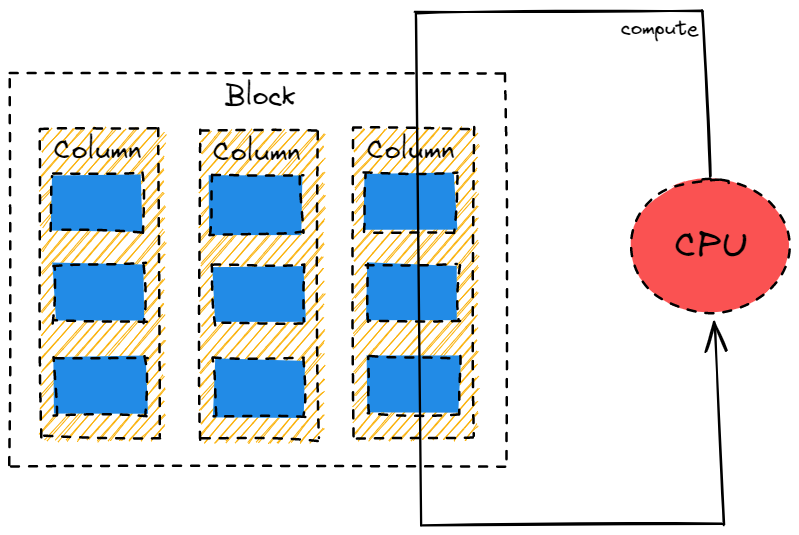
如上图所示
- TiFlash 在内存中以 Block 的形式来保存一批数据。Block 中以 Column 来保存每一列数据。
- TiFlash 计算过程中,以 Block 中的 Column 为计算单位,每次获取一个 Column 完成计算后,再获取下一个 Column。
了解 IFunction 接口
目前 TiFlash 所有的函数实现代码都放在 dbms/src/Functions 下面。我们以 dbms/src/Functions/FunctionsString.cpp 中的 FunctionLength 为例,来简单介绍一个向量化函数的工作过程。
向量化函数通常继承 dbms/src/Functions/IFunction.h 中的 IFunction 接口,接口定义如下(省去注释和部分成员函数)
class IFunction
{
public:
    virtual String getName() const = 0;

    virtual size_t getNumberOfArguments() const = 0;

    virtual DataTypePtr getReturnTypeImpl(const DataTypes & /*arguments*/) const;

    virtual void executeImpl(Block & block, const ColumnNumbers & arguments, size_t result) const;
};
getName返回 Function 的 name,name 是作为 TiFlash 向量化函数的唯一标识来使用。getNumberOfArguments记录向量化函数的参数有多少个。getReturnTypeImpl负责做向量化函数的类型推导,因为输入参数数据类型的变化可能会导致输出数据类型变化。
- FunctionLength::getReturnTypeImpl 会固定返回
Int64,属于比较简单的情况。
- FunctionLength::getReturnTypeImpl 会固定返回
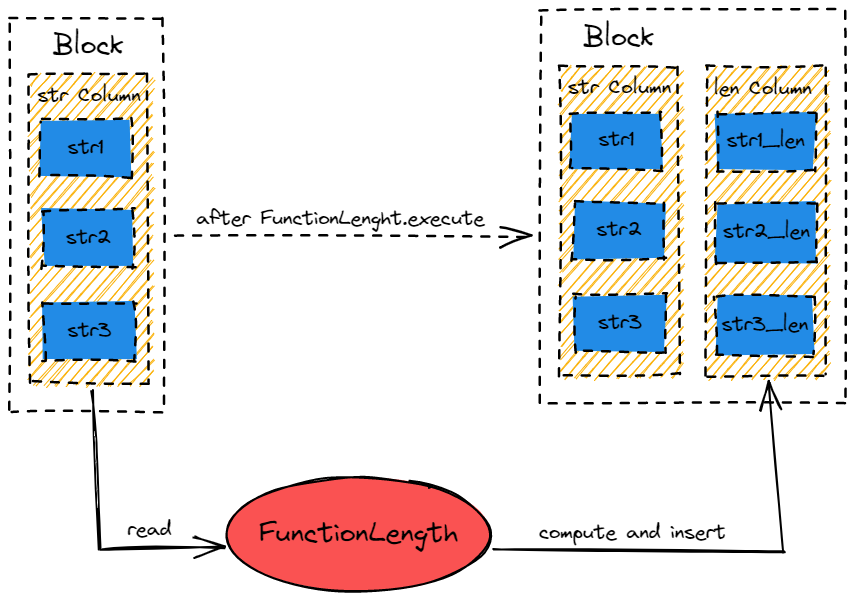
executeImpl负责向量化函数的执行逻辑,这也是一个向量化函数的主体部分。一个 TiFlash 向量化函数够不够"向量化",够不够快也就看这里了。
FunctionLength::executeImpl
的行为如下图所示,简单来说:
- 从 Block 中获取 str_column
- 创建同等大小的 len_column
- foreach str_column,获取每一个行的 str,调用 str.length(),将结果插入 len_column 中的对应行。
- 将 len_column 插入到 Block 中,完成单次计算。
    void executeImpl(Block & block, const ColumnNumbers & arguments, size_t result) const override
    {
        // 1.read str_column from block
        const IColumn * str_column = block.getByPosition(arguments[0]).column.get();

        // 2.create len_column
        int val_num = str_column->size();
        auto len_column = ColumnInt64::create();
        len_column->reserve(val_num);

        // 3.foreach str_column and compute
        Field str_field;
        for (int i = 0; i < val_num; ++i)
        {
            str_column->get(i, str_field);
            len_column->insert(static_cast<Int64>(str_field.get<String>().size()));
        }

        // 4.insert len_column to Block
        block.getByPosition(result).column = std::move(col_res);
    }
向量化计算本身并不神秘,精髓就是 foreach column。:)
了解 DataType 体系
TiFlash 数据类型的代码放在 dbms/src/DataTypes 下面。
class IDataType : private boost::noncopyable
{
public:
    virtual String getName() const;

    virtual TypeIndex getTypeId();

    virtual MutableColumnPtr createColumn() const;

    ColumnPtr createColumnConst(size_t size, const Field & field) const;
}
DataType 用于处理数据类型相关的逻辑,例如类型推导,Column 创建等等。
每一种数据类型都会有一个对应的实现 class DataType${Type} final : public IDataType。
值得注意的是,Nullable 本身并不是作为 DataType 的一个属性,而是独立一个 DataType 实现: dbms/src/DataTypes/DataTypeNullable.h 中的 DataTypeNullable 。
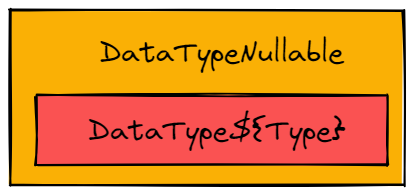
所以你会发现 DataTypeNullable(DataTypeString).isString() == false。
对于 DataTypeNullable,我们通常用 DataTypePtr data_type = removeNullable(nullable_data_type);来获取实际的数据类型。
了解 Column 体系
TiFlash 关于 Column 的主要代码放在 dbms/src/Columns 下面。
class IColumn : public COWPtr<IColumn>
{
public:
    virtual size_t size() const = 0;

    bool empty() const { return size() == 0; }

    virtual Field operator[](size_t n) const = 0;

    virtual void get(size_t n, Field & res) const = 0;
}
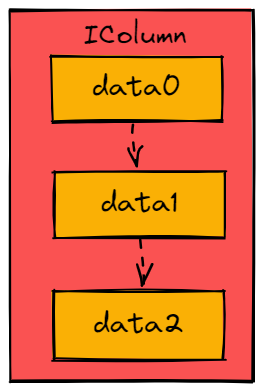
Column 是计算过程中列数据存放的容器。
获取 Column 中数据的一种常用手法是
for (size_t i = 0; i < column.size(); ++i)
    T data = column[i].get<T>();
Column 有两种类型
- 常量 column: dbms/src/Columns/ColumnConst.h 中的 ColumnConst
- 向量 column: dbms/src/Columns/ColumnVector.h 中的 ColumnVector
之所以要区分出这两类 Column 是为了在具体函数实现时可以做特殊优化提速。
比如 dbms/src/Functions/modulo.cpp 中的 ModuloByConstantImpl ,modulo(vector, const)可以将 a % b转换 为 a - a / b * b,这样会提速。
详情可见 faster-remainders-when-the-divisor-is-a-constant-beating-compilers-and-libdivide/ 。
ColumnVector 和 ColumnConst 使用姿势通常为
if (const ColumnVector * col = checkAndGetColumn<ColumnVector<Type>>(column.get()))
{
    // ...
}
else if (const ColumnConst * col = checkAndGetColumn<ColumnConst<Type>>(column.get()))
{
    // ...
}
我们通常使用 DataType::CreateColumn和 DataType::CreateColumnConst来创建 ColumnVector 和 ColumnConst。
除此之外 ColumnVector 对 string 和 decimal 分别有特殊优化实现:
大家可以去看看实现代码和相关的使用代码,这里就不展开了。
用 C++ 模板做类型体操
向量化函数里输入参数的类型可能会有很多种,比如 add 函数的输入数据类型可以是 UInt8, ..., UInt64, Int8, ..., Int64, Float32, Float64, Decimal32, ..., Decimal256,多达 14 种,如果要为每一种数据类型实现一遍执行逻辑是非常繁琐的。
用 C++ 模板做类型体操,简化函数开发逻辑是一种很常见的做法。
- 首先脱离具体的数据类型,将向量化函数的执行逻辑抽象成一个模板函数
template<typename Type1, typename Type2>
void executeImpl(Column<Type1> arg1, Column<Type2> arg2, ...);
在
IFunction::executeImpl将不同数据类型的参数转发给模板函数,在 TiFlash 里有几种转发做法- 用 DataType->getTypeId(),获取每一个 type 的标识,做 switch case 调用模板函数,例如 dbms/src/Functions/FunctionsString.cpp 中的 PadImpl::executePad 。
      TypeIndex type_index = block.getByPosition(arguments[0]).type->getTypeId();
      switch (type_index)
      {
      case TypeIndex::UInt8:
          executeImpl<UInt8>(block, arguments);
          break;
      case TypeIndex::UInt16:
          executeImpl<UInt16>(block, arguments);
          break;
      case TypeIndex::UInt32:
          executeImpl<UInt32>(block, arguments);
          break;
      case TypeIndex::UInt64:
          executeImpl<UInt64>(block, arguments);
          break;
      case TypeIndex::Int8:
          executeImpl<Int8>(block, arguments);
          break;
      case TypeIndex::Int16:
          executeImpl<Int16>(block, arguments);
          break;
      case TypeIndex::Int32:
          executeImpl<Int32>(block, arguments);
          break;
      case TypeIndex::Int64:
          executeImpl<Int64>(block, arguments);
          break;
      default:
          throw Exception(fmt::format("the argument type of {} is invalid, expect integer, got {}", getName(), type_index), ErrorCodes::ILLEGAL_TYPE_OF_ARGUMENT);
};- 用
castTypeToEither获取参数数据类型,调用模板函数,例如 dbms/src/Functions/FunctionsString.cpp 中的 FormatImpl::executeImpl 。
  void executeImpl(Block & block, const ColumnNumbers & arguments, size_t result) const override
  {
      bool is_type_valid = getType(block.getByPosition(arguments[0]).type, [&](const auto & type, bool) {
          using Type = std::decay_t<decltype(type)>;
          using FieldType = typename Type::FieldType;

          executeImpl<FieldType>(block, arguments);

          return true;
      });

      if (!is_type_valid)
          throw Exception(fmt::format("argument of function {} is invalid.", getName()));
  }

  template <typename F>
  static bool getType(DataTypePtr type, F && f)
  {
      return castTypeToEither<
          DataTypeDecimal32,
          DataTypeDecimal64,
          DataTypeDecimal128,
          DataTypeDecimal256,
          DataTypeFloat32,
          DataTypeFloat64,
          DataTypeInt8,
          DataTypeInt16,
          DataTypeInt32,
          DataTypeInt64,
          DataTypeUInt8,
          DataTypeUInt16,
          DataTypeUInt32,
          DataTypeUInt64>(type.get(), std::forward<F>(f));
  }
个人喜好选择哪一种都可以。当然,如果有 C++ 老司机们有自己喜欢的做法,请尽情施展,没必要局限在 TiFlash 已有的做法里。
step2: 实现下推
在这里我们对前篇 TiFlash 函数下推必知必会 所述开发流程做一个简单回顾。
1.首先在函数映射表里添加 TiDB Function 到 TiFlash Function 的映射。
根据函数的类型,映射表分别为
窗口函数 dbms/src/Flash/Coprocessor/DAGUtils.cpp 中的 window_func_map
聚合函数 dbms/src/Flash/Coprocessor/DAGUtils.cpp 中的 agg_func_map
distinct 聚合函数 dbms/src/Flash/Coprocessor/DAGUtils.cpp 中的 distinct_agg_func_map
标量函数 dbms/src/Flash/Coprocessor/DAGUtils.cpp 中的 scalar_func_map
2.然后根据函数的实现逻辑,我们可以选择
复用原有 TiFlash 函数的逻辑,
- 对类似
ifNull(arg1, arg2) = if(isNull(arg1), arg2, arg1)这种情况,我们可以考虑复用原有 TiFlash 函数的逻辑。 - 我们把 TiFlash 函数复用的代码实现放在 dbms/src/Flash/Coprocessor/DAGExpressionAnalyzerHelper.cpp 中的 DAGExpressionAnalyzerHelper::function_builder_map 里。
- 对类似
从头开始实现一个 TiFlash 函数
- 编写一个
FunctionClass,实现IFunction这个 interface 的四个接口。 - 然后调用
factory.registerFunction<FunctionClass>();注册函数。factory.registerFunction<FunctionClass>();通常会和函数实现放在一起,比如 String 函数都会放在 dbms/src/Functions/FunctionsString.cpp 中的 registerFunctionsString 。
- 编写一个
step3: UT 验证函数功能
在前篇 TiFlash 函数下推必知必会 里提到了关于 Unit Test 如何写。
这里补充一下大家比较关心的,怎么在本地把测试跑起来~
见 TiFlash repo 中 README.md 中所述。
To run unit tests, you need to build with -DCMAKE_BUILD_TYPE=DEBUG:
cd $BUILD
cmake $WORKSPACE/tiflash -GNinja -DCMAKE_BUILD_TYPE=DEBUG
ninja gtests_dbms # Most TiFlash unit tests
ninja gtests_libdaemon # Settings related tests
ninja gtests_libcommon
And the unit-test executables are at $BUILD/dbms/gtests_dbms, $BUILD/libs/libdaemon/src/tests/gtests_libdaemonand $BUILD/libs/libcommon/src/tests/gtests_libcommon.
集成测试
在前篇 TiFlash 函数下推必知必会 里提到了关于 Integration Test 如何写。
这里补充一下大家比较关心的,怎么在本地把测试跑起来~
测试的相关脚本在 /tests 目录下。
- 首先如 TiFlash 函数下推必知必会 中所述,起一个带有自己 build 好的 TiDB 和 TiFlash 的集群。
- 然后修改 /tests/_env.sh 里的 TiFlash 和 TiDB 的相关端口配置。
- 最后调用 /tests/run-test.sh 把测试跑起来,如
./run_test.sh $Build/tests/fullstack-test/expr/format.test。
How To Contribute
- 首先在 https://github.com/pingcap/tiflash/issues/5092 中认领一个你感兴趣的函数,并告诉大家你将会完成这个函数,避免同一个函数被重复认领。
- 然后就可以按照前面所述的内容,在本地完成开发测试。
- 在本地验证函数下推到 TiFlash 且执行结果无误,并且代码本身也觉得 ok 后,就可以提 pr 到 github 上。TiDB 和 TiFlash 各自需要提一个 pr,对应 TiDB 和 TiFlash 侧的修改。
- TiDB 和 TiFlash 两边的 pr merge 顺序并没有要求,大家可以放心提 pr~
- TiDB 和 TiFlash 的 pr 描述里都贴上对应 TiFlash/TiDB 的 pr 链接
- TiDB 和 TiFlash 的 pr 都需要补充 release note,例如
Support to pushdown ${function} to TiFlash
- 待两边 pr 都被充分 review,获得 LGT2 后,就可以由 committer merge 到 master。